Adobe Premiere Pro Shortcut Keys
ActionScript 2.0 Components Language Reference : Legal Notices: Online Privacy Policy. The dawn of a new era. The new VEGAS Pro 14 accompanies you when you're working on your projects from the start to the finish. You can edit your video and audio. What's new in CS6 To the top To the top New features overview Introduction to Adobe Premiere Pro CS6 Redesigned, customizable user interface New default workspace. Download the new ebook, 'Adobe CC & CS6 Design Basics' — and learn how to best use Photoshop, Illustrator & InDesign with easy tutorials.
Trimming clips in Adobe Premiere Pro CC. Discover the ease of editing clips in Premiere Pro: how you can quickly set In and Out points, trim clips in the Timeline, work with audio waveforms, and more. You define the first frame you want to include in a sequence by marking that frame as the clip’s In point. Then you define the last frame you want to include by marking it as the Out point. In a typical workflow, you mark In and Out points for a clip in the Source Monitor.
Adjusting a clip's In and Out points after it is already edited into a sequence is called trimming. Typically, you trim clips to adjust how they play back in a sequence. For example, as you view the edit, you want to cut to the incoming clip a little sooner than you originally planned while marking clips.
To fix that problem, trim the clip using trimming tools in Premiere Pro. You can trim clips by dragging the edge of a clip. Several specialized tools and techniques allow you to trim an edit point. These tools and techniques allow you to trim more easily and accurately, reducing the number of steps involved and maintaining the integrity of the sequence.
How to Use Adobe After Effects. Adobe After Effects is a software program that allows its users to create animation and other special effects for graphic-related.
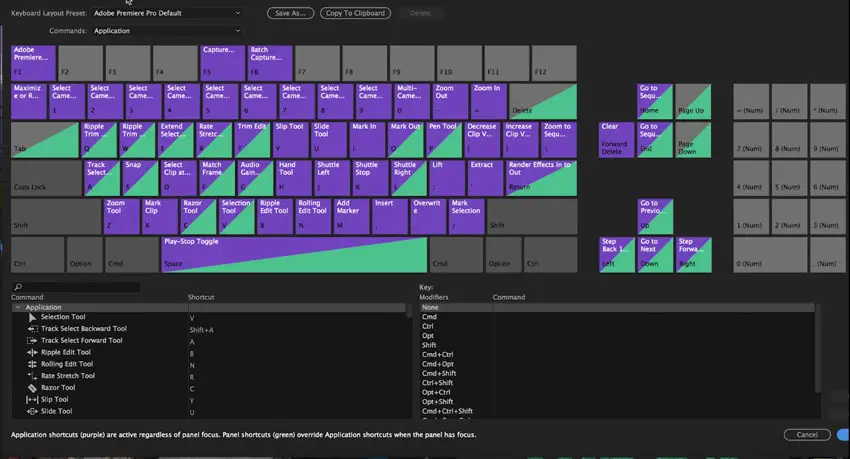
You can perform trimming tasks to selected edit points of a clip, or selected edit points from multiple clips. There are new icons for the tools, and when selecting edits with trim tools, the edit point is highlighted with a color related to the trim you perform. You can use keyboard shortcuts on selected edit points to trim clips in the timeline. Trimming in Premiere Pro has a keyboard driven workflow, as there are keyboard shortcuts for every trimming task.
See Timeline trimming. You can use Trim Mode to help you dynamically trim edit points using buttons, or keyboard shortcuts. You can use the J- K- L keys to dynamically trim clips. See Work in Trim Mode. There are many keyboard shortcuts available for the job of trimming, however, a number of them aren't set by default. Go to Edit > Keyboard Shortcuts (Windows) or Premiere Pro > Keyboard Shortcuts (Mac OS) to set trimming shortcuts.
You can work with audio clips, and audio from audio and video clips in the Source Monitor. You can view audio waveforms, scrub audio waveforms, and zoom in and out on audio waveforms. When opening an audio clip in the Source Monitor, audio waveforms appear automatically. When opening an audio and video clip in the Source Monitor, you can also view audio waveforms.
To view audio waveforms in an audio and video clip, choose Audio Waveforms from the monitor's panel menu. You can view the audio waveforms for clips containing multiple audio channels when opening them in the Source Monitor. In the Source Monitor, drag to the left.
The playhead appears where you click and the audio clip is played, forward or backward, at the speed at which you drag across, or scrub, the clip. You can zoom into an audio waveform in the.
Source Monitor to better identify locations for markers, In points. Out points. Double- click an audio clip in the Project panel. Source Monitor. To zoom in horizontally, drag either end of the zoom scrolling bar that runs below the time bar in the Source Monitor.
The waveform of all channels, and the time bar, will expand or contract horizontally. To zoom in vertically, do one of the following: To zoom in on a single channel, drag either. Source Monitor. To zoom in on all channels simultaneously, Shift- drag. Source Monitor. The waveform of one or all channels, and the decibel. Note: In Apple Mac.
Book Pro computers, you can move two fingers on the trackpad vertically or horizontally on the zoom scroll bar to zoom in and zoom out on audio waveforms. To scrub audio, move two fingers vertically or horizontally anywhere in the Source Monitor except the zoom scroll bar. Double- click the vertical zoom bar. After returning to the default zoom. The Source Monitor panel holds versatile tools, and methods for working with clips. You can use tools and techniques to set, move, or remove In and Out points, cue the playhead to any of these points, or preview the frames at their locations. To open a clip in the Source Monitor.
Double- click the clip in the Project panel. Double- click the clip in a Timeline panel. You can load more than one clip at a time in the Source Monitor.
However, you can view only one clip at a time. Recently loaded clips are available from a menu at the top of the Source Monitor. In the Source Monitor tab, click the downward- pointing. Select the name of the clip you want to view.
Note: You can assign keyboard shortcuts for selecting and. Source Monitor. Note: After you mark In and Out points, you can always change your mind before you edit the clip into the sequence. Drag the In or Out points to a new position in the time ruler. You can also drag the playhead to a new frame and use the Mark In or Mark Out buttons to set new In or Out points.
Do one of the following: For a video or audio clip, in the Source Monitor time ruler, drag the In/Out Grip (textured area at the center of the shaded span between the In and Out points). Fast And Furious 7 Song See You Again there. Make sure that you drag the textured area; otherwise, you simply cue the playhead. For an audio clip, you can also drag the In/Out Grip, or the gray area between the In point and Out point above the waveform to the left or right. The In and Out points move together, keeping the duration. Note: This technique also works with sequence In and Out points using the Program Monitor or a Timeline panel. Sometimes, adjusting In and Out points after a clip is in the Timeline is necessary. If you open a clip from the Timeline into the Source Monitor, you can drag the In/Out Grip in the Source Monitor to set new locations for the In and Out points.
This technique is useful for using a different section of a clip in the Timeline. In fact, it is one way to perform a Slip edit. Note: Viewing. in and out frames this way works only with clips that you’ve opened.
Source Monitor from a sequence. Set the In and Out points in the Source Monitor. Edit the clip into the Timeline. Double click the clip to load it into the Source Monitor.
You use the Source Monitor to cue a frame. Program Monitor to cue the current frame for.
You can use the Down Arrow key for the Go To Next Edit Point command and the Up Arrow key for the Go To Previous Edit Point command. This command works across all tracks, selected or not.
Note: You can also use buttons to go to the next edit in any of the targeted tracks in the Timeline, click the Go To Next Edit Point button and, to go to the previous edit in any of the targeted tracks, click the Go To Previous Edit Point button . The Go To Next Edit Point and Go To Previous Edit Point buttons are not available by default, however, they can be placed alongside the other playback controls with the button editor. Double- click a clip in the Project panel to open it in the Source Monitor. Note: Timeline clip instances are not source clips.
It is not possible to remove In points or Out points from timeline clips which have been loaded in the Source monitor. Choose from the following three commands: Marker > Clear In. Marker > Clear Out.
Marker > Clear In and Out. Note: You can also Alt- click (Windows), or Option- click (Mac OS) the Mark In button or the Mark Out button in the Source Monitor to clear an In or Out. For quickly trimming clips, do so in the Timeline.
You can use a combination of trim tools and keyboard shortcuts to select and adjust edit points. You can select edit points with the mouse, or by using keyboard shortcuts. Clicking with the mouse to select an edit point in the Timeline uses the location of the mouse cursor, the active trim tool, and the modifier keys. Note: Dragging, as opposed to clicking and releasing the mouse to select an edit point, both selects an edit point and performs the trim. Selection tool: Clicking the edit point with the Selection tool chooses a Trim In or Trim Out edit point selection, depending on which side of the edit point you click.
Adobe Education Exchange. I want to. Learnhow to use. Photoshopin. Graphic Design.
Search. Explore how members benefit from learning opportunities, teaching materials, discussions, & the community. Get instant access to free courses, workshops, & teaching materials and connect with the creative education community. Join for free. Join for free.